HTML 基础
常用的元素
工具与规范
实例练习
前言
表单是一种与服务器交换数据的方式,它使得我们可以用一系列组件收集用户提交的数据,发送给服务器的同时获取服务器的反馈。
$$tip
对于表单的学习,只需要能认识几个常见的表单组件,并能在页面上显示即可,目前无需学习表单的数据交互。
$$
表单元素
我们来看一个简单的表单。
<form>
    <input name="username" type="text" placeholder="请输入你的用户名" />
    <input type="submit" value="登录" />
</form>
$$demo
<form> <input name="username" type="text" placeholder="请输入你的用户名" /> <input type="submit" value="登录" /> </form>
$$
在这个例子中出现了两个不认识的元素, <form> 元素与 <input> 元素。 <form> 元素用来囊括所有的表单组件,而 <input> 元素就是表单组件之一。通过设置 type 属性, <input> 元素展现了输入框与按钮两种形态。
<input> 元素在下面的章节再细讲,这里还是先讨论 <form> 元素。
提交数据
$$tip
在网页发展的早期,表单被广泛应用于向服务器提交数据。后面随着 AJAX 开发方法的兴起,我们更多的是使用 JavaScript 与服务器交换数据,所以表单提交数据在现代化的开发方式下已经用得很少了。
因此不需要完全掌握表单提交数据,只需要有个大致的了解即可。
$$
收集到用户的数据了,当然要向服务器提交数据,设置 <form> 元素的 action 属性来决定提交的地址。
在学习阶段,我们肯定想了解提交数据之后服务器是否接收成功,收到的数据是什么。那么我们需要一个测试服务器来查看接收到的数据。
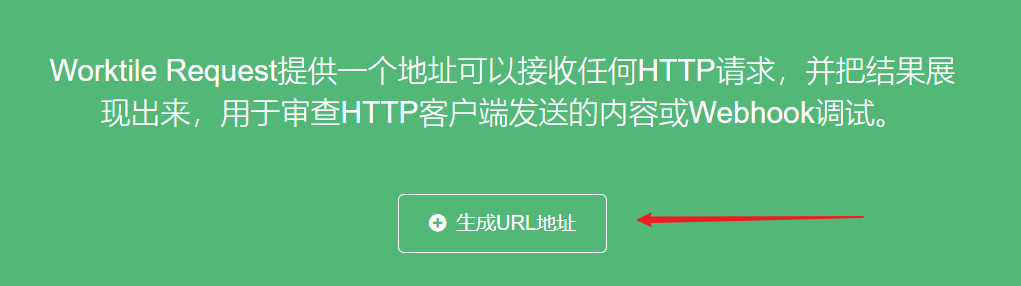
这里推荐使用 Worktile Request 来测试。
首先是点击网站上的生成 URL 来获取一个你特有的 URL。

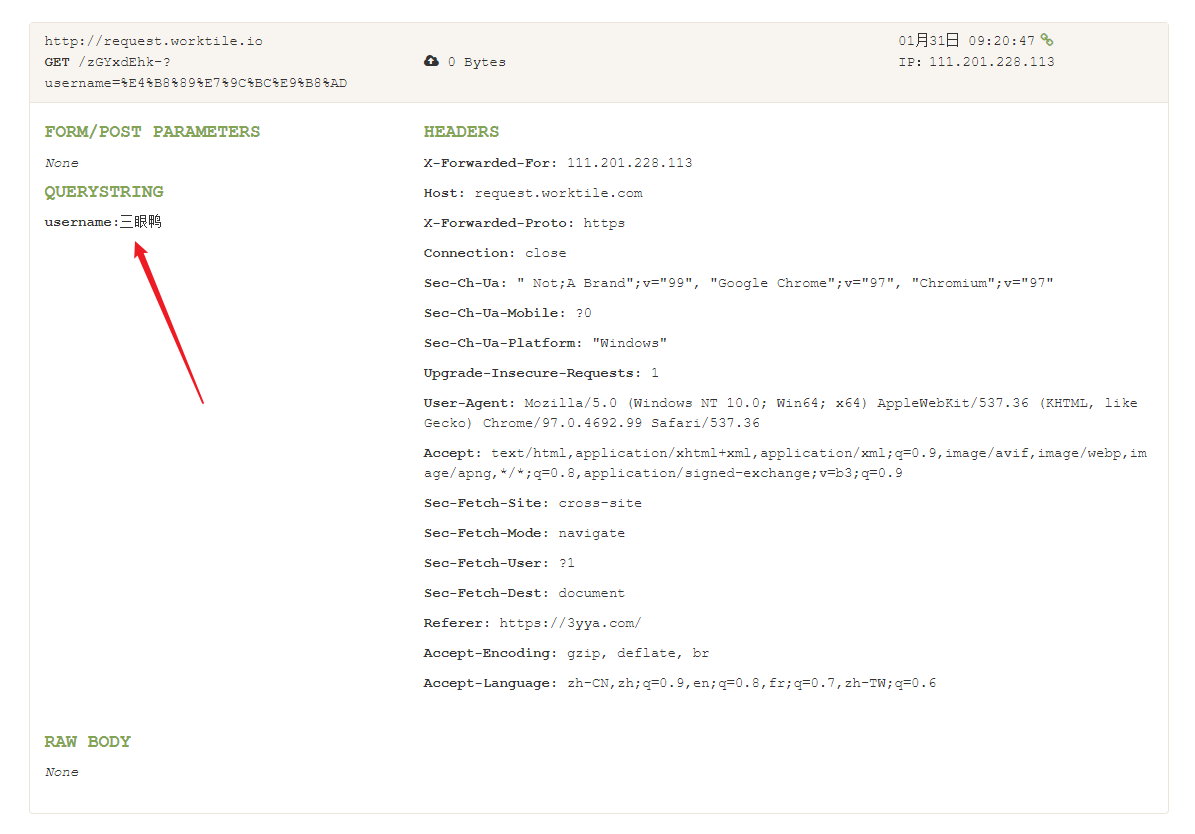
用生成的 URL 作为 action 属性的地址,点击登录按钮后回到 Worktile Request 的页面刷新查看结果。
<form action="https://request.worktile.com/zGYxdEhk-">
    <input name="username" type="text" placeholder="请输入你的用户名" />
    <input type="submit" value="登录" />
</form>
<iframe height="300" style="width: 100%" scrolling="no" title="form" src="https://codepen.io/3yya/embed/abVdzvV?default-tab=html%2Cresult&editable=true&theme-id=light" frameborder="no" loading="lazy" allowtransparency="true" allowfullscreen="true"></iframe>
在上面的输入框了输入 三眼鸭 点击登录后,刷新 Worktile Request 可以看到数据已经被成功接收。这里展示的是一个 HTTP 请求的数据,因为表单发起的是一个 HTTP 请求,有关 HTTP 可以查看 JavaScript 课件中的内容,现在学习对我们而言有点早了。
method 属性是提交数据的方法,默认值是 get ,可选的还有 post 。
- get: 数据附加到 URL 中传输。
- post: 数据在请求主体中传输。
表单属性
| 属性名 | 描述 |
|---|---|
| action | 提交数据的 URL。 |
| method | 提交的方法。<ul><li>get</li><li>post</li></ul> |
| enctype | 提交时的编码。<ul><li>application/x-www-form-urlencoded</li><li>multipart/form-data</li><li>text/plain</li></ul> |
| target | <p>提交数据后页面打开的位置。</p><ul><li>_self: 当前页面加载。(默认值)</li><li> _blank: 新窗口打开。</li><li> _parent: 父级窗口打开,只有在 iframe 内起效。</li><li> _top: 顶级窗口打开,只有在 iframe 内起效。</li></ul> |
表单输入组件
数据的类型有很多,为了收集不同类型的数据有一些原生的 HTML 表单组件可以使用,比如文本输入框、单选框、多选框、下拉框等等。
组件通用属性
绝大部分的表单组件都有一些共同的属性,通过以下的表格了解一下。
| 属性名 | 描述 |
|---|---|
| autofocus | 默认值:false。元素是否自动有输入焦点。 |
| disabled | 默认值:false。是否禁用元素。 |
| name | 元素的名称,将作为提交数据的键名。 |
| value | 元素的初始值。 |
文本输入框
单行文本输入框
type 属性为 text 意味着这是一个单行文本,同时 text 也是默认值。 placeholder 属性可以设置提示语。
<input type="text" placeholder="请输入你的用户名" />
$$demo
<input type="text" name="username" placeholder="请输入你的用户名" />
$$
Email 地址框
在提交数据时浏览器会对地址进行检查,确保符合邮箱的格式。在以下输入一个非邮箱地址试试看。
<input type="email" placeholder="请输入邮箱地址" />
$$demo
<form> <input type="email" placeholder="请输入邮箱地址" /> <input type="submit" value="确定" /> </form>
$$
密码框
密码框将会从样式上隐藏输入的文本,将其用星号之类的显示。
<input type="password" placeholder="请输入密码" />
$$demo
<input type="password" placeholder="请输入密码" />
$$
搜索框
搜索框的区别在于通常最右边会有 X 来清除内容,并且会有提示补全。
<input type="search" placeholder="请输入搜索的内容" />
$$demo
<input type="search" placeholder="请输入搜索的内容" />
$$
URL
与 Email 地址框类似,在提交前会进行内容格式检验。
<input type="url" placeholder="请输入链接地址" />
$$demo
<form> <input type="url" placeholder="请输入链接地址" /> <input type="submit" value="确定" /> </form>
$$
电话输入框
电话输入框更多是语义化,在样式和功能上并没有多大的差别。
<input type="tel" placeholder="请输入电话" />
$$demo
<input type="tel" placeholder="请输入电话" />
$$
多行文本框
多行文本框有两个重要属性 cols(列数), rows (行数)。并且多行文本框的默认值是放在元素内容之中,并不是 value 中。
<textarea cols="20" rows="10">默认值放在这里~</textarea>
$$demo
<textarea cols="20" rows="10">默认值放在这里~</textarea>
$$
数字
当输入的数字超出定义的范围,提交表单时将会报出警告。
- min: 最小值。
- max: 最大值。
- step: 步长。
<form>
    <input type="number" min="1" max="90" step="1" />
    <input type="submit" value="提交" />
</form>
试试输入超出范围的数据并提交。
$$demo
<form>
<input type="number" min="1" max="90" step="1" />
<input type="submit" value="提交" />
</form>
$$
label 元素
<label> 元素使用 for 属性与表单输入组件的 id 属性关联。
最明显的作用是点击 <label> 时跟点击输入组件作用是一致的,如果是输入框会获取焦点,如果是选择框会被反选,如果是按钮会触发点击事件。
<label for="username">点我会让输入框获得焦点</label>
<input type="text" name="username" id="username" placeholder="请输入用户名" />
$$demo
<label for="username">点我会让输入框获得焦点</label> <input type="text" name="username" id="username" placeholder="请输入用户名" />
$$
fieldset 和 legend 元素
使用 <fieldset> 和 <legend> 可以用来组合相同类别的信息,使表单看起来更规整。使用方法是用
<fieldset> 包含相同类别的表单输入组件,使用 <legend> 表示标签。
<form>
    <fieldset>
        <legend>用户信息</legend>
        <input type="text" name="username" placeholder="请输入用户名" />
    </fieldset>
    <fieldset>
        <legend>宠物信息</legend>
        <input type="text" name="petname" placeholder="请输入宠物名" />
    </fieldset>
    <input type="submit" value="提交" />
</form>
$$demo
<form> <fieldset> <legend>用户信息</legend> <input type="text" name="username" placeholder="请输入用户名" /> </fieldset> <fieldset> <legend>宠物信息</legend> <input type="text" name="petname" placeholder="请输入宠物名" /> </fieldset> <input type="submit" value="提交" /> </form>
$$
选择项
有时需要列出一些项目供用户选择,比如关于性别的选择就应该列出男女两项,防止用户输入无关的数据。这时就可以使用可选中项。
单选框
单选框只能选择唯一一个项目。适用于唯一项的选择,比如性别、最喜欢的事物等等。例子中 <label> 标签 for 属性与单选框 id 绑定,点击 <label> 同样可以选中。
<fieldset>
    <legend>你最喜欢的水果是什么?</legend>
    <div>
        <input type="radio" id="apple" name="fruit" value="apple" />
        <label for="apple">苹果</label>
    </div>
    <div>
        <input type="radio" checked id="cherry" name="fruit" value="cherry" />
        <label for="cherry">樱桃</label>
    </div>
</fieldset>
$$demo
<fieldset> <legend>你最喜欢的水果是什么?</legend> <div> <input type="radio" id="apple" name="fruit" value="apple" /> <label for="apple">苹果</label> </div> <div> <input type="radio" id="cherry" checked name="fruit" value="cherry" /> <label for="cherry">樱桃</label> </div> </fieldset>
$$
$$tip
单选框项的 name 属性必须一致时,才能产生单选效果。
$$
复选框
使用复选框可以让用户选择多个项目,同样使用 checked 表示默认选中的状态 。例子中 <label> 标签 for 属性与复选框 id 绑定,点击 <label> 同样可以选中。
<fieldset>
    <legend>你喜欢哪些水果?</legend>
    <div>
        <input type="checkbox" id="apple" name="fruit" value="apple" />
        <label for="apple">苹果</label>
    </div>
    <div>
        <input
            type="checkbox"
            checked
            id="cherry"
            name="fruit"
            value="cherry"
        />
        <label for="cherry">樱桃</label>
    </div>
</fieldset>
$$demo
<fieldset>
<legend>你喜欢哪些水果?</legend>
<div>
<input type="checkbox" id="apple" name="fruit" value="apple" />
<label for="apple">苹果</label>
</div>
<div>
<input
type="checkbox"
id="cherry"
checked
name="fruit"
value="cherry"
/>
<label for="cherry">樱桃</label>
</div>
</fieldset>
$$
下拉选择框
单选下拉框
<select name="fruit">
    <option value="apple">苹果</option>
    <option value="cherry">樱桃</option>
    <option value="banana">香蕉</option>
</select>
$$demo
<select name="fruit"> <option value="apple">苹果</option> <option value="cherry">樱桃</option> <option value="banana">香蕉</option> </select>
$$
多选选择框
通过添加 multiple 属性可以让下拉框变成多选选择框,按住 CMD / CTRL 能选择多个选项。
<select multiple name="fruit">
    <option value="apple">苹果</option>
    <option value="cherry">樱桃</option>
    <option value="apple">香蕉</option>
</select>
$$demo
<select multiple id="fruit" name="fruit"> <option value="apple">苹果</option> <option value="cherry">樱桃</option> <option value="apple">香蕉</option> </select>
$$
按钮
在 HTML 的表单中,有三种类型的按钮:
- submit: 数据提交按钮,点击后会将所在表单中的所有数据提交到表单
action属性指向的地址。 - reset: 重置按钮,顾名思义会重置表单中的值。
- button: 无附加功能,点击功能通过
JavaScript实现。
使用 <button> 元素或 <input> 元素来创建一个按钮,通过 type 属性来指定类型。稍有不同的是, <button> 允许包含 HTML 元素,这意味着按钮可以是样式复杂的文本甚至是图片,而 <input> 只能通过 value 属性设置单一的文本。
submit
<button type="submit"><em>提交</em></button>
<input type="submit" value="提交" />
$$demo <button type="submit"><em>提交</em></button> <input type="submit" value="提交" /> $$
reset
<form>
    <input type="text" value="三眼鸭" />
    <button type="reset"><em>重置</em></button>
    <input type="reset" value="重置" />
</form>
试着输入数据后点击重置按钮。
$$demo
<form> <input type="text" value="三眼鸭" /> <button type="reset"><em>重置</em></button> <input type="reset" value="重置" /> </form>
$$
button
<button type="button"><em>按钮</em></button>
<input type="button" value="按钮" />
滑块
滑块有三个和数字相似的属性:
- min: 最小值。
- max: 最大值。
- step: 间隔步长。
<input type="range" min="0" max="100" step="10" />
$$demo
<input type="range" id="amount" name="amount" min="0" max="100" step="10" />
$$
用户更希望能看到当前滑块的值,这个可以通过 JavaScript 实现。由于现在没学到 JavaScript ,可以等之后再回过头理解。
<iframe height="300" style="width: 100%" scrolling="no" title="form" src="https://codepen.io/3yya/embed/rNYxVYP?default-tab=js%2Cresult&editable=true&theme-id=light" frameborder="no" loading="lazy" allowtransparency="true" allowfullscreen="true"></iframe>
日期时间选择器
日期
<input type="date" />
$$demo
<input type="date" />
$$
时间
<input type="time"/>
$$demo
<input type="time" />
$$
本地日期时间
<input type="datetime-local" />
$$demo
<input type="datetime-local" />
$$
月
<input type="month" />
$$demo
<input type="month" />
$$
星期
<input type="week" />
$$demo
<input type="week" />
$$
拾色器
<input type="color" />
$$demo
<input type="color" />
$$
文件选择器
type="file" 表示这是一个文件选择器, multiple 表示允许一次选择多个文件, accept="image/*" 表示文件的类型, accept 接受一个 MIME_types 的值。
<input type="file" accept="image/*" multiple>
$$demo
<input type="file" accept="image/*" multiple>
$$
隐藏内容
这个隐藏的内容同样会被发给服务器,但它在页面上是不可见的。
<input type="hidden" name="location" value="beijing">
练习
-
使用表单组件创建下面的登录窗口。 $$demo <h1>用户登录</h1> <form> <div> <label for="username">用户名:</label> <input id="username" type="text" placeholder="请输入用户名" /> </div> <div> <label for="password">密 码:</label> <input id="password" type="password" placeholder="请输入密码" /> </div>
<button type="submit">登录</button> </form> $$
$$answer
<h1>用户登录</h1>
<form>
<div>
<label for="username">用户名:</label>
<input id="username" type="text" placeholder="请输入用户名" />
</div>
<div>
<label for="password">密 码:</label>
<input id="password" type="password" placeholder="请输入密码" />
</div>
<button type="submit">登录</button>
</form>
$$
- 创建下面的简历收集窗口。 $$demo <fieldset> <legend>应聘者信息</legend> <div> <label for="name">姓名:</label> <input type="text" id="name" placeholder="请输入姓名" /> </div> <div> <label for="age">年龄:</label> <input type="number" id="age" placeholder="年龄" min="18" max="90" step="1" /> </div> </fieldset> <fieldset> <legend>上传简历</legend> <label for="resume">选择你的简历:</label> <input type="file" id="resume" accept="application/pdf, application/msword, application/vnd.openxmlformats-officedocument.wordprocessingml.document" /> </fieldset> <button type="submit">提交</button> </form> $$
$$answer
<form>
    <fieldset>
        <legend>应聘者信息</legend>
        <div>
            <label for="name">姓名:</label>
            <input type="text" id="name" placeholder="请输入姓名" />
        </div>
        <div>
            <label for="age">年龄:</label>
            <input
                type="number"
                id="age"
                placeholder="年龄"
                min="18"
                max="90"
                step="1"
            />
        </div>
    </fieldset>
    <fieldset>
        <legend>上传简历</legend>
        <label for="resume">选择你的简历:</label>
        <input type="file" id="resume" accept="application/pdf, application/msword, application/vnd.openxmlformats-officedocument.wordprocessingml.document" />
    </fieldset>
    <button type="submit">提交</button>
</form>
$$
- 使用表单创建以下这张学生信息收集表。
$$demo
<h1>学生信息统计表</h1> <form> <fieldset> <legend>个人信息</legend> <div> <label for="name">姓名:</label> <input type="text" id="name" placeholder="姓名" /> </div> <div> <label for="age">年龄:</label> <input type="number" name="age" id="age" min="16" max="90" step="1" placeholder="年龄" /> </div> <div> <label for="phone">电话:</label> <input type="tel" id="phone" placeholder="电话" /> </div> <div> <label for="email">邮箱:</label> <input type="email" id="email" placeholder="邮箱" /> </div> <div> <label for="birthday">生日</label> <input type="date" name="birthday" id="birthday" /> </div> <fieldset> <legend>性别</legend> <div> <label for="male">男</label> <input type="radio" id="male" name="sex" value="male" /> </div> <div> <label for="female">女</label> <input type="radio" id="female" name="sex" value="female" /> </div> </fieldset> </fieldset> <fieldset> <legend>兴趣爱好</legend> <div> <label for="book">看书</label> <input type="checkbox" id="book" name="hobby" value="book" /> </div> <div> <label for="movie">看电影</label> <input type="checkbox" id="movie" name="hobby" value="movie" /> </div> <div> <label for="game">打游戏</label> <input type="checkbox" id="game" name="hobby" value="game" /> </div> <div> <label for="other">其他</label> <input type="checkbox" id="other" name="hobby" value="other" /> </div> </fieldset> <fieldset> <legend>个人介绍</legend> <textarea name="introduction" placeholder="个人介绍" rows="5" cols="60"
</textarea> </fieldset> <input type="submit" value="提交数据" /> </form>
$$
$$answer
<h1>学生信息统计表</h1>
<form>
    <fieldset>
        <legend>个人信息</legend>
        <div>
            <label for="name">姓名:</label>
            <input type="text" id="name" placeholder="姓名" />
        </div>
        <div>
            <label for="age">年龄:</label>
            <input
                type="number"
                name="age"
                id="age"
                min="16"
                max="90"
                step="1"
                placeholder="年龄"
            />
        </div>
        <div>
            <label for="phone">电话:</label>
            <input type="tel" id="phone" placeholder="电话" />
        </div>
        <div>
            <label for="email">邮箱:</label>
            <input type="email" id="email" placeholder="邮箱" />
        </div>
        <div>
            <label for="birthday">生日</label>
            <input type="date" name="birthday" id="birthday" />
        </div>
        <fieldset>
            <legend>性别</legend>
            <div>
                <label for="male">男</label>
                <input type="radio" id="male" name="sex" value="male" />
            </div>
            <div>
                <label for="female">女</label>
                <input type="radio" id="female" name="sex" value="female" />
            </div>
        </fieldset>
    </fieldset>
    <fieldset>
        <legend>兴趣爱好</legend>
        <div>
            <label for="book">看书</label>
            <input type="checkbox" id="book" name="hobby" value="book" />
        </div>
        <div>
            <label for="movie">看电影</label>
            <input type="checkbox" id="movie" name="hobby" value="movie" />
        </div>
        <div>
            <label for="game">打游戏</label>
            <input type="checkbox" id="game" name="hobby" value="game" />
        </div>
        <div>
            <label for="other">其他</label>
            <input type="checkbox" id="other" name="hobby" value="other" />
        </div>
    </fieldset>
    <fieldset>
        <legend>个人介绍</legend>
        <textarea
            name="introduction"
            placeholder="个人介绍"
            rows="5"
            cols="60"
        ></textarea>
    </fieldset>
    <input type="submit" value="提交数据" />
</form>
$$